Converting audio and slides to a YouTube video

This  is a process that seemed like it would be a piece of cake but turned out to be more difficult and time-consuming than I imagined.  A couple of colleagues did a 45-minute presentation which they audio-recorded.  My task was to generate and upload a YouTube video matching the Powerpoint slides to the audio. This is what I did:

1. I opened the .wav format audio (recorded using a Zoom recorder)  into Adobe Audition.  I edited the audio to eliminate background hum and some parts that were clearly unusable or not needed.

2. I gave a copy of this edited file to the presenter’s assistant, who went through it to identify and write down start/stop points for each of the 38 slides.

3. In Adobe Audition, I added markers for the start point for each of the slides.  I converted the markers to range markers (pairs of markers that identify ranges, e.g., 2:21 – 3:07)  and then moved the ending marker for each range to the appropriate place in the timeline. (Note: I shortened this task by combining the audio segments for the last six or seven slides, which were short, into one range.)

4. I exported the range markers to individual .mp3 files.

5. I imported the Powerpoint slides into Adobe Captivate 6, and did some tweaking to make sure the slides looked good.

6. I imported the audio files into Captivate, one at a time, in most cases one audio for each slide. (For the last several slides, I used Captivate’s editor to match a longer audio across several slides. This did not seem to be any more efficient. But it was worthwhile to test this other approach.)

7. I tweaked the Captivate presentation audio and slides.

8. I exported the Captivate presentation to an mpg4 file for review by the presenter’s assistant.

9. I made a few additional edits based on her comments.

10. As requested, I broke the Captivate presentation into three parts and saved each part as a separate file.

11. I exported each of the parts as mp4 files.

Mp4 Export Example

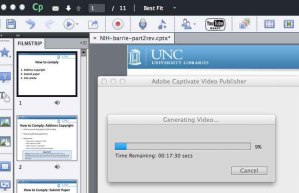
Exporting a Captivate 6 file as an mp4

The export process is somewhat time consuming. As you can see, exporting a section of 11 slides took around 20 minutes.

12. I uploaded the mp4 files to YouTube, created a playlist, and added descriptions.

13. Based on feedback, I tweaked the sections (which slides are included in each section), and  uploaded the sections to YouTube again.

As you can probably tell from the above, what on first blush may seem like a simple task may sometimes turn out to not be so simple. Next time I think I will probably try a different approach. One alternative would be to import the edited audio into a full-motion screencasting program such as Screenflow or Camtasia and then record the presenter flipping through the slides in real time as the audio plays. That would probably be a less painful way to match the slides to the audio.

Or another possibility:  Video-record the presentation live.  Now that’s a novel idea. 🙂
Saving files in pdf format

As discussed in the last post, pdf (portable document format) is usually the best file format to use to put posters online. Pdf retains the formatting of the source file such that it can be viewed by someone who doesn’t have the software you used to create the poster – all he or she needs is the free Adobe Reader (downloadable from the Adobe website).

Saving files to pdf file format from PowerPoint or from InDesign is pretty straightforward. Here’s how to do it with some recent versions of Powerpoint for Mac and for Windows, and with Adobe InDesign CS6.  If you have another version, the procedure will be similar even if it looks a little different.

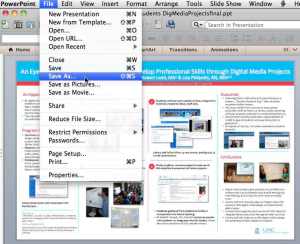
In PowerPoint 2011 for Macintosh, choose File menu > Save As…

MacPpt2011-Save_As

Continue reading ‘Saving files in pdf format’

Uploading posters to a blog

There are several reasons you may want to upload posters to a blog, such as to make posters presented at a conference publicly available, to publicize a research project, or to display posters from a class. If you are teaching a class that includes a poster assignment, it would be nice to upload class posters so that students can see what their classmates have done and also to promote their work.

But what file format should you use?  And how will they appear on the blog once you upload them?

Uploading posters: file types

You probably used either PowerPoint or InDesign to create your poster. The file formats you are most likely to consider for uploading to a blog are jpeg, pdf, and ppt (PowerPoint).

.pdf format is usually the best option. You can set up a link to a pdf file in a blog post so it will open the pdf when the user clicks on the link.  To do it this way you need to first export/save your original Powerpoint or InDesign file in pdf format, then upload the exported pdf file to the blog. An example:
davegamandi-thumbnail

How to inexpensively host videos that appear on your blog

It is a truism to say that video has become ubiquitous among computer users. People are constantly viewing computer videos, and more and more people are creating their own.  No doubt practically everyone who has a blog or website has considered adding videos to it. Which brings up the question of how to host videos you want to display. VideoPress and YouTube are two good options. Continue reading ‘How to inexpensively host videos that appear on your blog’

Use Backup Software!

It is almost always better to use software designed for backing up rather than using your operating system to copy items from one location to another. There are several reasons for this. Among other things, backup software verifies that the source and destination copies are identical and performs checks to see that data hasn’t been corrupted during backup. Backup software also gives you options that give you more control over the backup process.

There are several good software options for backing up. On the Macintosh, Chronosync (http://www.econtechnologies.com) and SuperDuper! (http://www.shirt-pocket.com) are two highly regarded programs.

SuperDuper!

SuperDuper!

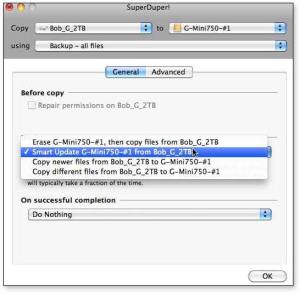
SuperDuper! has a user interface that is elegant in its simplicity. When you start, you see a dialog box that allows you to specify the source and destination as well as the kind of backup you want to do. Each option is clearly explained. Continue reading ‘Use Backup Software!’

Working with folders and files: Adobe Bridge

Adobe Bridge is a powerful file browsing program that is popular with graphic and media designers.  It is available for both Windows and Macintosh, but only with the purchase of another Adobe program (it is packaged with other Adobe software and is free). If you own an Adobe program, you probably also have Adobe Bridge.

Interface

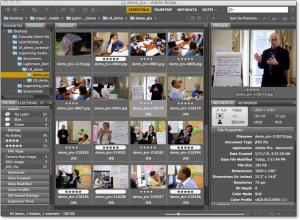
When you start up Bridge, you see its interface, which is made up of several panels. The appearance varies depending on its current preferences (Adobe Bridge menu > Preferences), and how it appeared when it was last closed.

Options for Renaming Batches of Files

Digital cameras assign filenames to files that are not likely to be meaningful. For example, Canon uses file names such as IMG_9819.CR2  (for a camera raw file) or IMG_2904.JPG (for a jpeg file).  It is almost always advisable to rename these files.  Ideally the best time to to do this is when you import images from your camera memory card to the computer.

However at some point you may want to rename files that you previously imported or already have on your computer– possibly a large number of files.  For example, if you took photos at the beach, you may want to rename them so that they would all have “beach” in the filename. Continue reading ‘Options for Renaming Batches of Files’